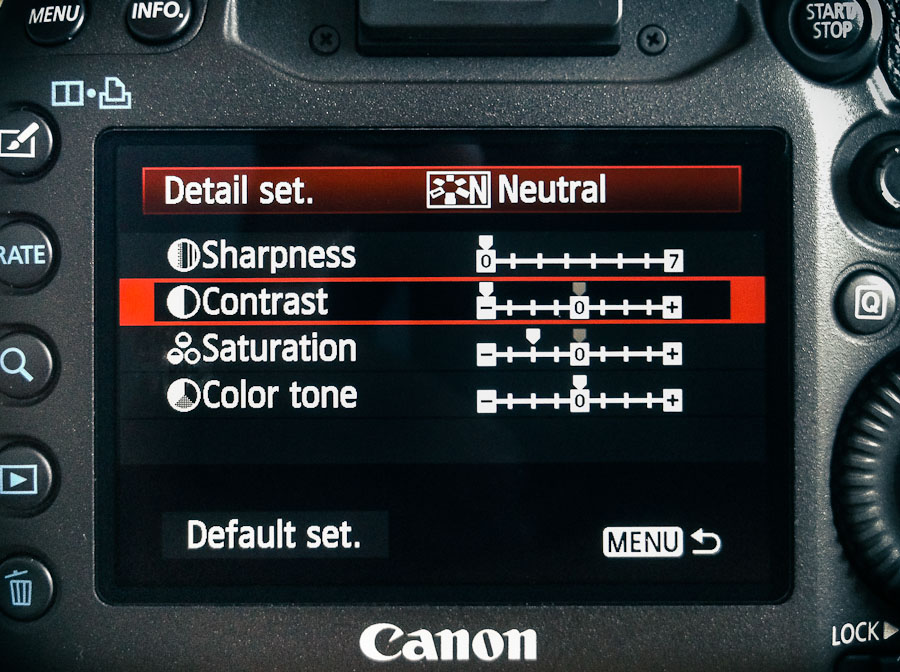
For shooting video, I’ve set up every Canon HDSLR I’ve owned the same way since the very beginning, and the 5D Mark III is no different.
- Start with the Neutral Picture Style
- Set Sharpness to zero—all the way to the left
- Set Contrast all the way to the left
- Set Saturation two notches to the left
That’s it. That’s Prolost Flat—the Picture Style of choice for Vincent Laforet, Philip Bloom, Jason Wingrove, and many others.
Prolost Flat FAQ
How did you come to these settings? How do you know they’re right?
They’re not “right,” they’re just good. Prolost Flat has been tested the only way I care about—by shooting stuff and trying to make it look great.
What about [some other custom picture style]?
It’s probably great. But it is possible to over-think this stuff, and there is such a thing as too flat.
All we’re trying to do here is bring back everything the camera has to offer in an easy-to-color-correct package. To put it another way, what you want from a flat profile is to eliminate the contrast s-curve that the most Picture Styles bake into the footage. Some custom Picture Styles go so far beyond “flat” that they actually invert this curve. This not only makes the image harder to grade, it can cause quantizing and compression artifacts to show up right in the middle of your tonal range, where they’re most noticeable.
What about log? Isn’t log the best transfer function for grading?
Yes. And in particular, Technicolor CineStyle is very nice. If you like it too, please do use it. It’s great.
But without meaning any disrespect to the folks at Technicolor, there’s one big reason why you might not want to use their Picture Style. Prolost Flat can be set up in seconds on any Canon HDSLR, in the field, without any cables, computers, or downloads. What if your camera dies on a remote shoot and you rent a replacement? Or a friend shows up with his 7D and offers it as a B camera? Or you need to work with footage from another crew? Prolost Flat is always available and works on every Canon HDSLR. It’s easy to set up and you can coach someone through the process over the phone, or even in a text message.
I’ve heard a lot of people use Prolost Flat, but bump up the sharpness a bit. Canon HDSLR video is so soft, isn’t a little sharpening a good idea?
Yes. But not in camera. Never use in-camera sharpening.
- It tends to be of a poorer quality than what you can do in post.
- It’s very difficult to monitor and set up accurately in the field. What looks good on a portable LCD might look hideous back in the grading suite in your calibrated, 1080p display.
- Different scenes can benefit from amounts of sharpening. What worked on the low-contrast charts at your test bench might create horribly over-sharpened results with a high-contrast exterior shot.
- Baking sharpening into your footage is as permanent as a bad tattoo. On your face. Better to give yourself the option to dial it in later, under controlled circumstances, using the amazing array of powerful post-production tools available.
- Different output media require different amounts of sharpening. The sharpening you use for a YouTube upload will be different than what you want for a broadcast master, which will be different than a Blu-ray master.
In the slideshow below, you can see one example of sharpening using the After Effects Unsharp Mask effect, with an Amount of 120 and a Radius of 1.1. You can download full-res comparison frames here.
But doesn’t in-camera sharpening happen before compression? If I’m sharpening in post, aren’t I also sharpening and enhancing compression and noise?
Yes. But in-camera sharpening is such a blunt instrument that even its privileged position of operating prior to compression can’t save it.
A light pass of noise reduction from something like Magic bullet Denoiser II not only cleans up some compression artifacts, it also can promote your 8-bit footage to higher color fidelity by interpolating new, high-bit-depth pixels. So your HDSLR processing pipeline should look like this:
- In a 16 or 32bpc environment…
- Reduce noise
- Visual effects, if any
- Color correct
- Sharpen
- Add back some noise/grain to taste
- Titles or graphics, if any
Sharpening is a perceptual exercise. You want to sharpen what the viewer sees. So it’s critical that sharpening be performed after color correction.
Everyone says the 5D Mark III’s video is even softer than the Mark II’s. Maybe just a little in-camera sharpening?
No. The Mark III’s softness is simply the lack of artificial sharpness that came from the aliasing that plagued the 5D Mark II. This means that the footage takes sharpening in post even better than 5D Mark II footage, because there are fewer inherent artifacts to bring out.
It would be nice if the 5D Mark III resolved more detail than it does (there is plenty of room for improvement there), but adding in-camera sharpening won’t make that dream a reality. It only adds permanent, ugly artifacts to your image.
Cool. I’m just going to bump up the sharpening by one tick. Sorry.
Are you sure you wouldn’t be better off with a hacked GH2?
One last strike against in-camera sharpening: It limits your ability to add additional sharpening in post. You don’t want to sharpen sharpening artifacts. You can see in the below comparison how even one notch of Sharpness adds ringing artifacts that will make sharpening in post problematic. These are 1:1 crops—you can download an archive of the full-res frames here.
I’m just a shooter and don’t always have control over what happens to my footage. I like to add sharpness so my clients don’t complain about soft footage. My children need wine!
You might also want to re-think shooting flat then. Prolost Flat is designed to be graded—and specifically, graded underneath an s-curve. If you’re not going to be around to see this done properly, you might not be pleased with how your footage winds up looking in the final conform.
What about Highlight Tone Priority?
Highlight Tone Priority is an optional method Canon uses to capture more highlight detail by “pushing” the ISO one stop. The result is one extra stop of highlight detail (roughly), coupled with one extra stop’s worth of noise (also roughly).
When I first posted about Prolost Flat, I recommended using HTP for bright scenes with difficult highlights. But since then, I’ve completely stopped using it. The benefits don’t tend to outweigh the risks. And by “risks,” I mean that you might leave HTP on and shoot a bunch of raw stills, and wonder why they don’t look as nice as they should in Lightroom. Unlike other settings discussed here, HTP does affect raw stills. Oops.
Speaking of which, what happens if I leave my HDSLR set to Prolost Flat when I shoot stills?
JPEG shots and the embedded JPEG preview in raw files (what you see on the camera’s LCD when chimping) will be created using the Picture Style. But of course, the actual image date in the raw file is unaffected. And of course you’re shooting raw, right?
I leave my cameras in Prolost Flat all the time, even for stills. If find that the flat preview image gives me a better sense of the actual raw “negative” that I’m capturing. The only thing you have to get used to is that it’s easy to underexpose slightly if you judge exposure by the preview image, as the Prolost Flat preview looks a touch brighter than most default raw processing.
What’s the right s-curve to use?
The one that looks best to you. All I’ll suggest is that you use the same one from shot to shot.
You can watch me setting up some s-curves and grading under them in my Colorista II tutorials and my demonstration of color correcting food photography.
Share this article using the url prolost.com/flat
 Friday, April 13, 2012 at 1:59PM