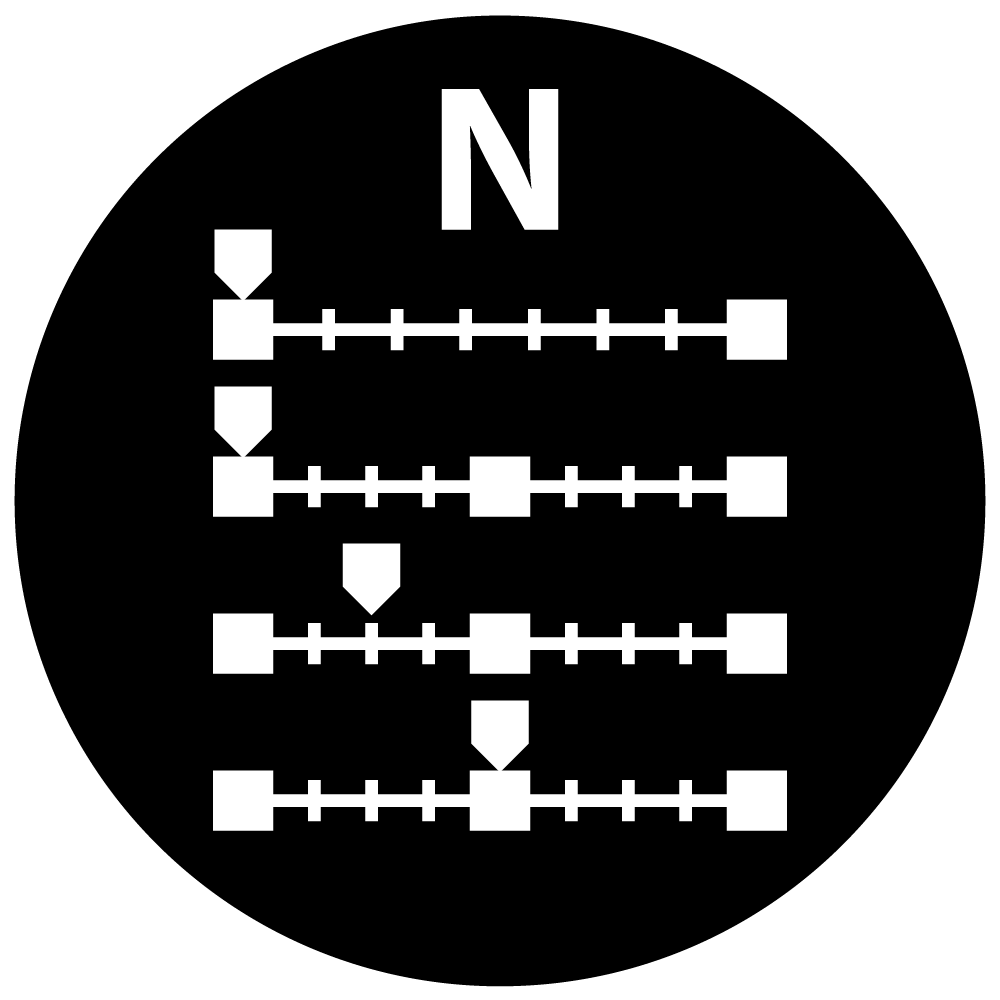
Tools

Slugline. Simple, elegant screenwriting.

Red Giant Color Suite, with Magic Bullet Looks 2.5 and Colorista II

Needables
  • Sony Alpha a7S Compact Interchangeable Lens Digital Camera
    Sony Alpha a7S Compact Interchangeable Lens Digital Camera
    Sony
  • Panasonic LUMIX DMC-GH4KBODY 16.05MP Digital Single Lens Mirrorless Camera with 4K Cinematic Video (Body Only)
    Panasonic LUMIX DMC-GH4KBODY 16.05MP Digital Single Lens Mirrorless Camera with 4K Cinematic Video (Body Only)
    Panasonic
  • TASCAM DR-100mkII 2-Channel Portable Digital Recorder
    TASCAM DR-100mkII 2-Channel Portable Digital Recorder
    TASCAM
  • The DV Rebel's Guide: An All-Digital Approach to Making Killer Action Movies on the Cheap (Peachpit)
    The DV Rebel's Guide: An All-Digital Approach to Making Killer Action Movies on the Cheap (Peachpit)
    by Stu Maschwitz

Entries in Canon 7D (22)

Tuesday
Apr102012

Prolost Flat

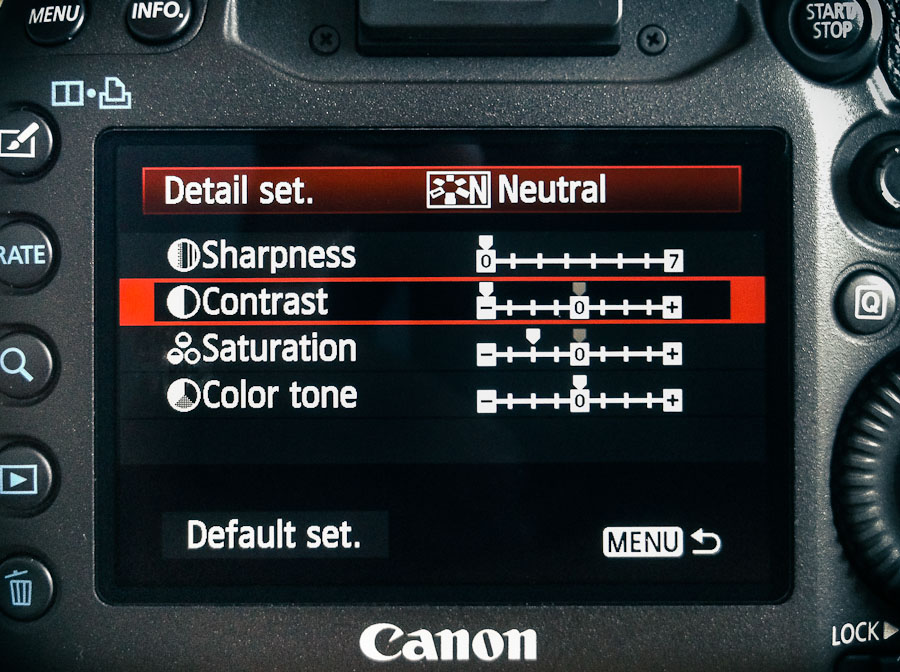
For shooting video, I’ve set up every Canon HDSLR I’ve owned the same way since the very beginning, and the 5D Mark III is no different.

  • Start with the Neutral Picture Style
  • Set Sharpness to zero—all the way to the left
  • Set Contrast all the way to the left
  • Set Saturation two notches to the left

That’s it. That’s Prolost Flat—the Picture Style of choice for Vincent Laforet, Philip Bloom, Jason Wingrove, and many others.

Prolost Flat FAQ

How did you come to these settings? How do you know they’re right?

They’re not “right,” they’re just good. Prolost Flat has been tested the only way I care about—by shooting stuff and trying to make it look great.

What about [some other custom picture style]?

It’s probably great. But it is possible to over-think this stuff, and there is such a thing as too flat.

All we’re trying to do here is bring back everything the camera has to offer in an easy-to-color-correct package. To put it another way, what you want from a flat profile is to eliminate the contrast s-curve that the most Picture Styles bake into the footage. Some custom Picture Styles go so far beyond “flat” that they actually invert this curve. This not only makes the image harder to grade, it can cause quantizing and compression artifacts to show up right in the middle of your tonal range, where they’re most noticeable.

What about log? Isn’t log the best transfer function for grading?

Yes. And in particular, Technicolor CineStyle is very nice. If you like it too, please do use it. It’s great.

But without meaning any disrespect to the folks at Technicolor, there’s one big reason why you might not want to use their Picture Style. Prolost Flat can be set up in seconds on any Canon HDSLR, in the field, without any cables, computers, or downloads. What if your camera dies on a remote shoot and you rent a replacement? Or a friend shows up with his 7D and offers it as a B camera? Or you need to work with footage from another crew? Prolost Flat is always available and works on every Canon HDSLR. It’s easy to set up and you can coach someone through the process over the phone, or even in a text message.

I’ve heard a lot of people use Prolost Flat, but bump up the sharpness a bit. Canon HDSLR video is so soft, isn’t a little sharpening a good idea?

Yes. But not in camera. Never use in-camera sharpening.

  • It tends to be of a poorer quality than what you can do in post.
  • It’s very difficult to monitor and set up accurately in the field. What looks good on a portable LCD might look hideous back in the grading suite in your calibrated, 1080p display.
  • Different scenes can benefit from amounts of sharpening. What worked on the low-contrast charts at your test bench might create horribly over-sharpened results with a high-contrast exterior shot.
  • Baking sharpening into your footage is as permanent as a bad tattoo. On your face. Better to give yourself the option to dial it in later, under controlled circumstances, using the amazing array of powerful post-production tools available.
  • Different output media require different amounts of sharpening. The sharpening you use for a YouTube upload will be different than what you want for a broadcast master, which will be different than a Blu-ray master.

In the slideshow below, you can see one example of sharpening using the After Effects Unsharp Mask effect, with an Amount of 120 and a Radius of 1.1. You can download full-res comparison frames here.

But doesn’t in-camera sharpening happen before compression? If I’m sharpening in post, aren’t I also sharpening and enhancing compression and noise?

Yes. But in-camera sharpening is such a blunt instrument that even its privileged position of operating prior to compression can’t save it.

A light pass of noise reduction from something like Magic bullet Denoiser II not only cleans up some compression artifacts, it also can promote your 8-bit footage to higher color fidelity by interpolating new, high-bit-depth pixels. So your HDSLR processing pipeline should look like this:

  1. In a 16 or 32bpc environment…
  2. Reduce noise
  3. Visual effects, if any
  4. Color correct
  5. Sharpen
  6. Add back some noise/grain to taste
  7. Titles or graphics, if any

Sharpening is a perceptual exercise. You want to sharpen what the viewer sees. So it’s critical that sharpening be performed after color correction.

Everyone says the 5D Mark III’s video is even softer than the Mark II’s. Maybe just a little in-camera sharpening?

No. The Mark III’s softness is simply the lack of artificial sharpness that came from the aliasing that plagued the 5D Mark II. This means that the footage takes sharpening in post even better than 5D Mark II footage, because there are fewer inherent artifacts to bring out.

It would be nice if the 5D Mark III resolved more detail than it does (there is plenty of room for improvement there), but adding in-camera sharpening won’t make that dream a reality. It only adds permanent, ugly artifacts to your image.

Cool. I’m just going to bump up the sharpening by one tick. Sorry.

Are you sure you wouldn’t be better off with a hacked GH2?

One last strike against in-camera sharpening: It limits your ability to add additional sharpening in post. You don’t want to sharpen sharpening artifacts. You can see in the below comparison how even one notch of Sharpness adds ringing artifacts that will make sharpening in post problematic. These are 1:1 crops—you can download an archive of the full-res frames here.

I’m just a shooter and don’t always have control over what happens to my footage. I like to add sharpness so my clients don’t complain about soft footage. My children need wine!

You might also want to re-think shooting flat then. Prolost Flat is designed to be graded—and specifically, graded underneath an s-curve. If you’re not going to be around to see this done properly, you might not be pleased with how your footage winds up looking in the final conform.

What about Highlight Tone Priority?

Highlight Tone Priority is an optional method Canon uses to capture more highlight detail by “pushing” the ISO one stop. The result is one extra stop of highlight detail (roughly), coupled with one extra stop’s worth of noise (also roughly).

When I first posted about Prolost Flat, I recommended using HTP for bright scenes with difficult highlights. But since then, I’ve completely stopped using it. The benefits don’t tend to outweigh the risks. And by “risks,” I mean that you might leave HTP on and shoot a bunch of raw stills, and wonder why they don’t look as nice as they should in Lightroom. Unlike other settings discussed here, HTP does affect raw stills. Oops.

Speaking of which, what happens if I leave my HDSLR set to Prolost Flat when I shoot stills?

JPEG shots and the embedded JPEG preview in raw files (what you see on the camera’s LCD when chimping) will be created using the Picture Style. But of course, the actual image date in the raw file is unaffected. And of course you’re shooting raw, right?

I leave my cameras in Prolost Flat all the time, even for stills. If find that the flat preview image gives me a better sense of the actual raw “negative” that I’m capturing. The only thing you have to get used to is that it’s easy to underexpose slightly if you judge exposure by the preview image, as the Prolost Flat preview looks a touch brighter than most default raw processing.

What’s the right s-curve to use?

The one that looks best to you. All I’ll suggest is that you use the same one from shot to shot.

You can watch me setting up some s-curves and grading under them in my Colorista II tutorials and my demonstration of color correcting food photography.

Share this article using the url prolost.com/flat

Thursday
Jan272011

Color Correcting Food with Colorista II

My friend Pete came by with some Canon 7D (UPDATE: Oops, it’s the 5D Mark II) video and stills. We sat together for about an hour grading the video to match the stills, which had been professionally shot and processed by photographer Eric Wolfinger. We used After Effects CS5, Colorista II, and the DV Rebel Tools scripts from The DV Rebel’s Guide.

What I find interesting about this session is that it provides one answer to a common question: “Why doesn’t the video I shoot with my DSLR look as good as the stills?” Setting aside numerous technical issues, a big part of it is that stills shooters, as a rule, color correct their shots before letting the world see them.

Here’s the session:

And here’s the before/after:

Sunday
Dec052010

The Panasonic GH2, DSLRs, and Funky Frame Rates For Creative Effect 

Many folks wrote in the comments of my Canon 60D article something to the effect of “what about the upcoming Panasonic GH2?”

The GH2 is not yet available. Despite having been briefly up for pre-order on both Amazon and B&H, it is now listed as unavailable on both sites. That, and that it is not a DSLR, excuse it from inclusion from an article titled “HDSLR Shopping.”

However, the GH2 does look very exciting. I had been thinking of selling my 7D and buying a 60D, but I might wait and get a GH2 instead. My only real trepidations about that are covered in my post about the Panasonic AF100, where I discuss the slightly-smaller-than-35mm imager and the dearth of fast motorized lenses.

In brief, if you’re not familiar, the GH2 is a mirrorless interchangeable-lens camera in the Micro 4/3 format. Being mirrorless, it is not a DSLR — but the desire to compare them is natural. Like our Canon HDSLRs, it is a stills camera with a video mode. What it promises over the Canons and Nikon HDSLRs are cleaner, higher-resolution video images and Panasonic’s signature attention to the needs of video shooters, with features like touch-to-focus, on-screen audio level monitoring, “Cinema Mode” color profile, clean HDMI out, and even a 1:1 crop mode — which allows you to take an HD crop out of the center of the frame, effectively acting as a digital tele-extender with no light loss.

The predecessor to the GH2, the GH1, broke my heart by suffering from compression artifacts so egregious that I resorted to rhyme. By all accounts, the GH2 does much better in this area, although it joins a sadly crowded category of cameras that seem to do everything right and then commit all your hard work to a codec just barely sufficient for the task.

One of the things that piqued my interest about the GH2 was its “Variable Movie Mode,” which purports to allow over- and under-cranking. Turns out this feature is not very exciting in practice. Panasonic’s site shows what looks like a broad array of speed options, from “80%” to “300%.” However, it soon becomes clear that the increments, 80, 100, 160, 200 and 300 percent, are significant in that they represent frame rates likely to be available on almost any camera.

If your base, 100%, is 24 fps, then 80% is 30 fps, 160% is 15 fps, 200% is 12 fps, and 300% is 8 fps. My 7D has 24 and 30, and if I wanted 15 fps, I’d just shoot at 30 and double in post. Same with 12 and 24. And if I wanted to shoot at 8 fps for some unprecedented reason, I’d shoot at 24 fps and speed up 3x in post.

The 7D and 60D shoot at 60p in a heavily artifacted 720p format (which I nonetheless used indulgently in Brick & Steel). The GH2 can shoot 1080i60, which you could de-interlace carefully and create 60 fps slow-mo (detailed instructions for this are included in The DV Rebel’s Guide). In both cases you’d better watch out for high-frequency horizontal detail in your frame, because it’s going to be dancing the night away. So the GH2 is not really offering much more than the 60D in the variable frame-rate department.

UPDATE: The GH2 also shoots 720p60, which is the better choice for slow motion.

What filmmakers really need are funky frame rates all around the home-base of 24, and overcrank rates that can be cleanly sped up in case you discover in the edit that your shot wants to be more John Ford than John Woo. Here are some of my favorites:

  • 24p is our everyday frame rate for sync sound and business as usual.
  • Undercranking by only one tick to 23 fps speeds up motion so unnoticeably that it’s recommended for almost any fight scene not featuring Tony Jaa.
  • After lunch, when everyone’s moving a bit slower, you can shoot fight scenes at 22 fps. You can even drop down to 21, but things might start to look a bit keystone cops at that point.
  • [UPDATE: See the comments for a discussion of achieving these undercrank speeds in post, if your camera does not offer them]
  • I have seen car and motorcycle drive-bys juiced-up by undercranking as far as 12 fps. Only works on smooth surfaces.
  • Moving into overcrank territory, shooting 30 fps for 24p playback can give scenes an almost imperceptibly dreamy quality. Everything feels a bit lighter and floatier, but you’re not telegraphing “slow motion” to the audience. Many of the behind-the-scenes shots in Brick & Steel were shot at 30.
  • If I’m worried that 30 might be noticeable, I’ve been known to shoot at 27 fps, which always sends the camera assistant scrambling to make up a new velcro-backed number for the slate.
  • 36 fps is exactly 1.5x slower than normal. The audience will know something is up, but it’s still subtle.
  • In fact, so is 48 fps. You’d think that half-speed would seem slow, but it doesn’t feel as slow as it sounds. 48 is handy because you can double it in post and be back to real time.
  • Since my 7D has 50 fps, not 48, I’ll use that when I think I might want to double back to real time.
  • Many cameras top out at 60 fps, which is fine for slow-mo, but it’s hardly Inception-grade slow-mo. Still, it’s nice. See the flyswatter in Brick & Steel.
  • Better is 72 fps. 72 is just a pretty slow motion speed. And conveniently, you can 3x it in post and you’re back to real time.
  • I shot some fight scenes in The Spirit at 88 fps. Why? Because it’s a nice slow speed, and if you 4x it in post, you’re back to 22 fps. So I could ramp from amped-up speed to dramatic slow in the same shot.
  • 120 is another handy speed at 5x real time. And beyond that, you’re into frying-pan-to-the-face slow motion effects.

OK, we’ve gone a bit off the topic of the GH2. But this is the ride my mind went on after getting excited about the “Variable Movie Mode” and then realizing what a non-thing it actually is. All it really buys you is the slight convenience of not having to conform different footage speeds in post, and the nicety of being able to preview these speeds in on-set playback.

The GH2 is going to be similar in price to the 60D, i.e. cheap. You’re going to have to spend more, like AF100 or Sony F3 money, to get the funky frame rates I list above, and even in those cases, you’re topping out at 60 fps (which, in the case of the Sony, is only available at 720p). I’ve completely lost track of the various cameras that Red is busily making, but hefty overcrank rates are something they promise, at a proportional price.

Meanwhile, If you, like me, are excited about the little GH2 despite its shortcomings in the frame-rate department, check out what Phillip Bloom has done with his pre-release model.

And I’ll let you know if I find one under my Christmas tree.

Friday
Nov192010

BRICK & STEEL

A fake trailer for a sequel to a movie that was never made, a birthday party gone horribly wrong, a CalArts reunion, and a fun test of achieving a hyper-poppy Stephen Sonenfeld (colorist on Transformers, Mission Impossible III and my Playstation spot) look on 5D and 7D footage (+ Redrock Micro Stubling, Eyespy DeluxeZacuto Z Finder Pro, and Zoom H4N) using Magic Bullet Denoiser, Colorista II, and Mojo. Budget = beer. Lots and lots of beer. Also available at 1080p on YouTube. For some reason.