Tools

Slugline. Simple, elegant screenwriting.

Red Giant Color Suite, with Magic Bullet Looks 2.5 and Colorista II

Needables
  • Sony Alpha a7S Compact Interchangeable Lens Digital Camera
    Sony Alpha a7S Compact Interchangeable Lens Digital Camera
    Sony
  • Panasonic LUMIX DMC-GH4KBODY 16.05MP Digital Single Lens Mirrorless Camera with 4K Cinematic Video (Body Only)
    Panasonic LUMIX DMC-GH4KBODY 16.05MP Digital Single Lens Mirrorless Camera with 4K Cinematic Video (Body Only)
    Panasonic
  • TASCAM DR-100mkII 2-Channel Portable Digital Recorder
    TASCAM DR-100mkII 2-Channel Portable Digital Recorder
    TASCAM
  • The DV Rebel's Guide: An All-Digital Approach to Making Killer Action Movies on the Cheap (Peachpit)
    The DV Rebel's Guide: An All-Digital Approach to Making Killer Action Movies on the Cheap (Peachpit)
    by Stu Maschwitz

Entries in Filmmaking (181)

Thursday
Apr082010

iPad for Filmmaking, Day Six Report

I’ve had my iPad for six days now, as anyone following me on Twitter knows. I realize that some of my Twitter followers find the iPad chatter to be a divergence from my usual filmmaking tweets seasoned with occasional missives about coffee and photography (both of which are, for me, filmmaking tools)—but that’s not the way I see it. My iPad has been quite busy over the first near-week of its life as a filmmaking tool.

First and foremost, I hoped that I would enjoy reading screenplays on my iPad, and I am happy to report that I do, very much. I read a ton of screenplays, many in PDF format. I hate reading them on my computer screen, especially my laptop. Not because of the backlit screen, but because of the psychological association I have with my computers. They are devices for doing work. They are a constant and cacophonous source of distraction. Reading screenplays, even well-written ones, is weirdly not easy. If you’re susceptible to distraction, reading a screenplay on a laptop can be like trying to count ceiling tiles at a Victoria’s Secret fashion show.

Printed screenplays are much better, but I hate wasting the paper myself. If they come to me printed, great—but even when printed double-sided (which welcomely is now the industry standard), they add up in meatspace. My 17” MacBook Pro, an extra battery, power adapter, and three screenplays crammed in a bag is a recipe for a very sore shoulder.

The minute the iPad apps started flooding the iTunes store, I began a search for a good PDF reading app. I flirted briefly with converting the screenplays to the ePub format used by Apple’s iBooks app, but with disastrous results. Here’s a cool article by someone more persistent that I—but while I certainly gave up in part due to laziness, it was also because I realized that ePub is not ideal for screenplays. ePub books can be re-flowed and re-paginated on the fly by the device, and that’s not a good thing for scripts, where white space, formating, and page numbers matter.

I didn’t just want to be able to read screenplays, I wanted to be able to make notes on them. There is a full-blown PDF annotation app called iAnnotate PDF, but I skipped it due to its complexity, and to be honest, because it is about the ugliest app I’ve seen yet on the iPad app store. I don’t need a ton of functionality, I just need to make little margin notes, like one can easily do in Apple’s under-appreciated Preview app on the OS X desktop.

Which sadly ruled out the simple, elegant, and bargain-priced (for now) GoodReader, which has a number of fans, including writer/director John August.

I found my sweet spot with ReaddleDocs. It is fairly priced at $4.99, and while not a standout in UI design (the icon is unfortunate, and the mechanics of organizing files are convoluted), it somehow has nailed exactly the amount of information I want on my screen when reading a script.

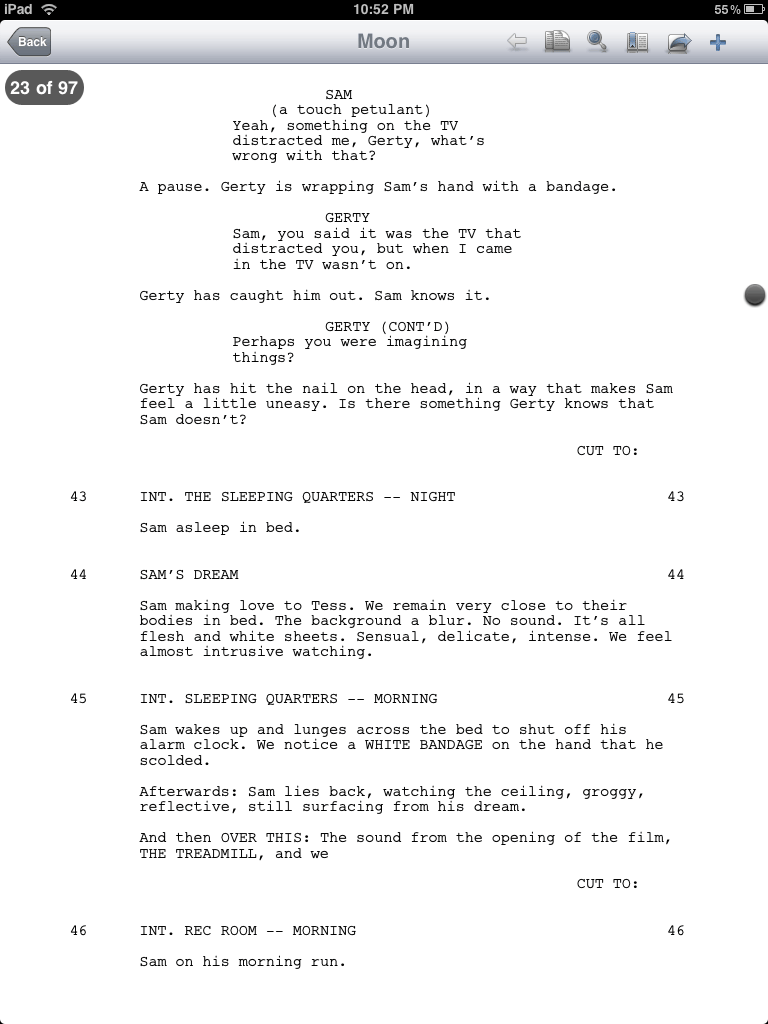
Some iPad periodicals have been criticized for failing to provide a sense of place within the larger document. Readdle is doing two things to subtly combat that here. Obviously the current page number and total page count are at the top of the document, but what I really love is the black dot on the right. When holding a printed screenplay, you always have an intuitive sense of how far through the document you are. The dot provides that perfectly. Wonderful.

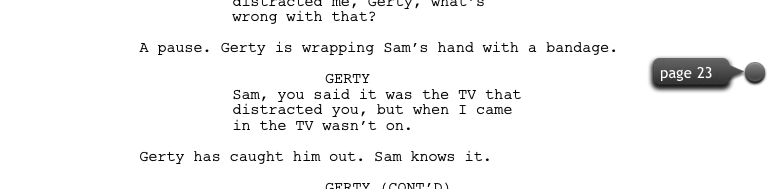
Tap that dot and you can rapidly move to any page. The refresh rate is standard-issue iPad-awesome.

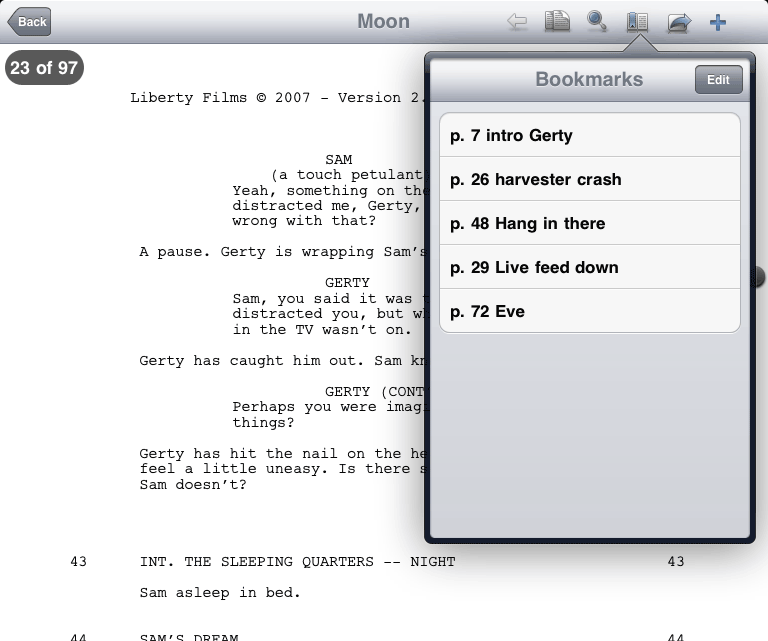
ReaddleDocs allows you to set as many bookmarks as you like, and name them. This is the capability that I have bastardized into a basic margin notes feature. Brevity is warranted, lest you type right off the edge of the screen (a forgivable bug for a day-one app). Another reason not to go too crazy with the bookmark/notes is that there is no way to export them.

The last thing I’ll say about Readdle is that, like GoodReader, it knows that the default iPhone OS PDF reading service is unsatisfactory, and replaces its scrolling model with a page-turning one. Here I have another minor complaint (which echoes August’s about GoodReader)—the page turning gesture in ReaddleDocs is too stubborn, and the redraw is not as slick as the rest of the app. Again, I forgive this as a version-one issue that would be hard to test for without an actual device in hand. I don’t expect (or want) fancy iBooks-like page flipping animation, just something simple and smooth (and left-to-right) like what’s in the excellent Amazon Kindle app.

Readdle and GoodReader can both grab your PDFs from the web, Dropbox, email accounts, and computers on a shared Wi-Fi network. There is a seemingly never-ending flow of classic screenplays available at mypdfscripts.com.

So that’s reading screenplays—how about writing them? Final Draft is working on something for the iPad, as are the developers of iPhone screenwriting apps Screenplay and ScriptWrite. Until those options materialize though, the clever duo of Joke and Biagio have created a template for Apple’s Pages app that achieves screenplay formatting via Styles, which allow some automation (hitting Return after a character name will take you to a dialog element automatically), but not much (no Tab to advance through elements).

Adobe has a cloud-based, colaborative screenwriting web app called Adobe Story, currently categorized as a “free preview version” at Adobe Labs. Who would have thought that Adobe would provide the Google Docs of screenplays? There’s even a standalone AIR app. If ever there was a screenwriting app that wanted to be on the iPad, its Adobe Story. And with Adobe running AIR apps on iPads on day one, maybe there’s hope.

If you plan on writing anything long on the iPad, you may want to consider a physical keyboard. I like the Apple Bluetooth Keyboard because it allows flexibility in how you position and orient the device, and because Bluetooth was named after a Viking.

There are several movies that provide endless sources of inspiration to me, and since I own them all on DVD, I have no compunctions at all about ripping them with Handbrake and storing them on the iPad. Sex them up with cover art from this search engine (in iTunes, File > Get Info, Artwork tab, Add).

I used Apple Compressor to make iPad-friendly version of my demo reel, my short films, and various other inspirational videos found around the web.

I’m using the new Publish functionality in Lightroom 3 Public Beta 2 to fill my iPad with portfolio images, along with color reference stills, reference images for projects in development, and the usual family photos. Since I don’t use iPhoto, I just tell iTunes to sync my iPad with a specific folder I’ve created. Sub-folders become iPad “albums.”

So I have a dozen screenplays, a half-dozen feature films (with commentary tracks), my entire photography portfolio, and the ability to watch anything Netflix streams, all tucked neatly in my new murse. Not bad for less then a week into things. I bought the iPad with specific (and, so far, not very adventurous) ideas about how it could instantly become a useful filmmaking tool, and so far it has met and exceeded my expectations.

Wednesday
Jan272010

Make Movies With Apple iPad

Today Apple announced the iPad, and what I like most about what we’ve seen so far is that Apple clearly thinks it’s important that we be able to make things with it. The redesigned iWork apps are impressive experiments in creating stuff using a multitouch display. I liked my iPhone enough when it was just a phone, but I love it now that I have Storyboard Composer (formerly Hitchcock), Screenplay, and Photoshop Mobile, to name just a few.

I also use an app called Air Mouse to control the Mac Mini in my home theater. That, and the many other apps that allow your iPhone or iPod Touch to act as control device for your computer, made me ponder the possibility of using the iPhone’s multitouch screen as a control surface for Magic Bullet Looks. But I never took the idea very far because of the small size of the screen.

Folks doing color correction either know first-hand the value of a dedicated control surface, or avoid finding out for fear of the can’t-live-without-it sensation. An understandable fear, given the cost of these peripherals. Back in 2008 when I wrote about gestural interfaces and hardware devices, I expected to spend a couple grand at the very least for any kind of multitouch control device. Video pros routinely spend much, much more for large, cumbersome, single-purpose color control surfaces. Read any review of them and you’ll see one common thread: once you work a three-way color corrector with a set of trackballs that allow you to adjust multiple parameters at once, you never want to go back.

Imagine the dude above is looking at a stripped-down version of the Magic Bullet Looks interface on his main display. The Tool Chain, Preset and Tool Drawers, and touch-friendly Tool Controls appear on his iPad.

The iPad may seem expensive to people with a laptop, a smartphone, and little room in their life for something in between, but for video and film professionals looking for a general-purpose way to get more touchy-feely with their creations, it’s beyond a bargain.

As long as the software shows up.

So what do you think? Is the image above something that interests you? It’s just a hasty concept—nothing more. But it’s got me thinking about all kinds of ways that an iPad could become a part of the way we make films—not just with dedicated apps, but with companion apps that give us new ways of interacting with our favorite desktop tools.

Tuesday
Jan262010

Color Correcting Canon 7D Footage

A frequent concern about shooting to a heavily-compressed digital format—something the DV Rebel often finds herself doing—is the degree to which the footage will be “color correctable.” Will the shots fall apart when subjected to software color grading? Or will you be able to work with the footage as fluidly as you tweak your raw stills in Lightroom?

It’s a valid concern. The movies that the current crop of HDSLRs shoot are highly compressed. This compression is perceptual, meaning that it takes advantage of visually similar colors and shapes, and represents those regions with less accuracy than the detailed and varied parts of the image. This makes perfect sense, but often in color grading one seeks to enhance color contrasts—to make a face pop off a similarly-colored background for example—and so you may well create high contrasts between colors that were once nearly identical, and as such were given short shrift by the camera’s compression.

You might have noticed a similar phenomenon in audio. An low-bit-rate MP3 that sounds decent enough can suddently sound awful after even a tiny amount of EQ. Another case of perceptual compression limiting your options.

While you will never find as much data and detail in your HDSLR video as you do in that same camera’s raw stills, the H.264 movies created by the Canon 7D, 5D and 1D Mark IV will withstand some massaging in post. Here are some tips (similar to those found in greater detail in The DV Rebel’s Guide) to help you get the best results.

  • Shoot flat. If you read Flatten your 5D, you know that I am a proponent of setting up a “flat” Picture Style using the camera’s built-in controls. The same settings I specced out for the 5D Mark II apply to the 7D and 1D Mark IV as well, although with the 7D I’m less likely to use Highlight Tone Priority, as this setting can increase shadow noise, and the 7D is not as noise-free as the other Canon HDSLRs.
  • Chose WB wisely. Use a white balance preset that gives you as nuetral an image as possible. Shooting with an incorrect white balance reduces your dynamic range, because you wind up with an image that’s prematurely blown-out in one color channel, dark and noisy in others.
  • Expose to the right. Make the brightest image you can without clipping something important. A rule-of-thumb considered gospel by many photographers, but our reasoning is a bit different. Yes, we, like the stills guys, wish to avoid excess noise in the shadows, but that’s not our main concern. Remember that term perceptual compression. Dark areas of an image get less bits. If you underexpose, you’ll have to brighten the image in color correction, and you’ll reveal all kinds of nastiness the camera thought you’d never see.
  • Do denoise. It doesn’t really matter what denoising software you use, but use it. When you carefully and subtly denoise your footage, you rebuild your pixels anew, which is especially nice when you follow the next tip:
  • Work at high bit-depths. If you start with an 8-bit image and do a gentle de-noise, you’re blending pixels values together to create new colors. Although there’s no such thing as something for nothing, doing this at a higher bit-depth means those new colors have massivly more gradations than the original image. Your subsequent color work will hold up much better.
  • Sharpen last. Your flat Picture Style removed the camera’s built-in sharpening. Add your own at the very last step. The amount you use will vary depending on the output medium, so test test test.

By folllowing these guidelines you can make good-looking shots even better with color correction. But what about a shot that isn’t so great to start with? Turns out there’s hope. Below is a 7D shot that I grabbed in an uncontrolled situation. In my haste, I underexposed, and used the “cloudy” white balance when I probably should have used tungsten. But with a little denoising, careful analysis of the colors in the image, and a Colorista Power Mask, I was able to rescue this shot.

Yes, you can color correct your HDSLR footage, and you should. Color correction can make a good shot great, and in a pinch, put an unusable shot back in the game.

Saturday
Jan162010

Gearing Up

Nothing profound here, just some fun new gear mixing well with some trusty old gear into what for me is a “where have you been all my life” rig.

Pictured here is the Canon 7D with the venerable Canon 50mm f/1.4. It’s sitting on the skeleton of the Redrock Micro “Captain Stubling” rig, handles removed, and slipped into Redrock’s tripod platform plate. That’s sitting on a crusty old Bogen fluid head that I had lying around (the current equivalent in size would probably be the popular Manfrotto 701HDV).

That’s mounted to my new slider rig from Glidetrack. It’s the Glidetrack HD to be specific, and I chose the 1M length, which feels like the right balance of utility and portability for me. I’m more likely to use it for push-ins than for side-to-side motions, and when you’re using it for the “slow creep,” there’s only so long a slider can be before it shows up in your shot. There are a number of terrific options out there for slider rigs, but the Glidetrack was the right choice for me because of its minimal weight and mechanical simplicity.

Hovering above it all on the Noga arm is the Ikan V5600, which is a comparatively inexpensive, lightweight HDMI monitor. It doesn’t have quite the full 720p resolution the peaking features of the Marshall V-LCD70P, [CORRECTION, Mitch below pointed out that the Marshal is not 720p—in fact it has a lower resolution than the Ikan!], but it’s still quite usable for focus. The photo above lies in its streamlined simplicity—the power and HDMI cables for the monitor make it quite a bit messier in practice.

Speaking of focus, the Redrock Micro whip makes that a little easier when back-panning on the slider. The whips come in sets of three — shown below is the shortest of the bunch. The build quality on the Redrock whips is very good.

What’s missing obviously is a good set of sticks, or possibly two, to properly support the Glidetrack. I’m still shopping and open to suggestions.

Gear porn shots like these requires bokake, here courtesy of the Canon 50mm f/1.2L on my 5D Mark II, the price of which was recently lowered.


Disclaimer: I contributed to the design of the Redrock Micro Captain Stubling rig, which recently received a glowing review on episode 53 of the always awesome Red Centre podcast.

As always, I am grateful if you shop through any of the above links, or at the ProLost store 7D Cine page!