Deadlines are good.
I only had the camera for a week. And for that entire week, there it sat, unused except for a few test shots. I should shoot something nice with it, I kept thinking. Something pretty. Before the day comes that I have to send it back.
And then that day came, and I had a shipping label in my hand, and zero footage. Meanwhile, my wife and her sister—who, as a company of two people, have a less developed procrastination method than my lone enterprise allows—asked if I could take a few behind-the-scenes photos of them testing new scents for their line of handmade candles.
“Sure, but how about we shoot a video too?” I said before I’d thought it through.
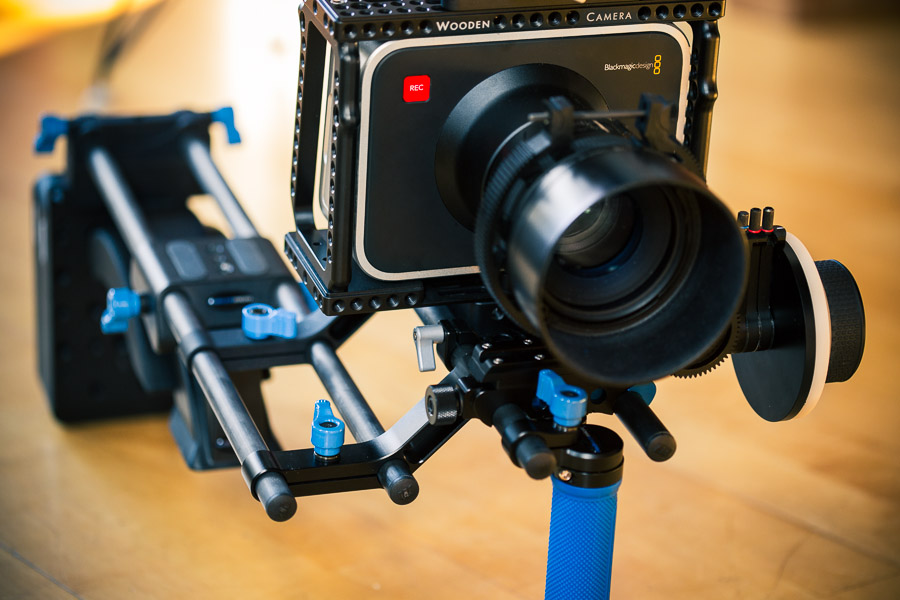
I jammed the borrowed Blackmagic Cinema Camera onto my Redrock Micro EyeSpy rig, attached my Canon 50mm f/1.2 L, and got to work.
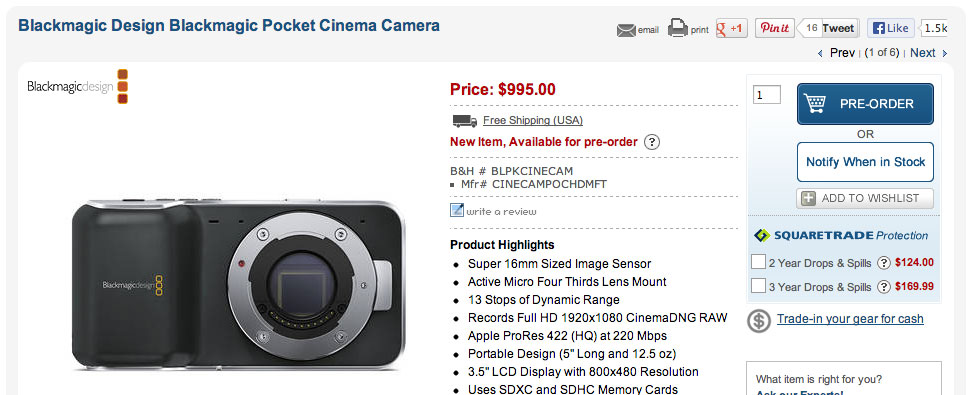
BMC: Befuddling, Magnificent Camera

As perfectly expressed by Vincent Laforet (the generous loaner of this particular BMC), the Blackmagic Cinema Camera is a perplexing mix of unmatched bang-for-the-buck, along with some maddening shortcomings and inscrutable design decisions.
Upon picking up the camera body, I was immediately impressed with its build quality. It’s solid, pleasingly minimal, and made with high-quality metal, rubber, and plastic. What it is not, is light. The body alone weighs 3.75 lbs, and this one had the Wooden Camera BMC Kit (Advanced) grafted on with a sense of permanence that a gracious borrower would balk at challenging, adding nearly three pounds. Slap on a lens and you’re in an awkward zone of too heavy to hold, too small to stop trying.
Hold Me?
The large touch LCD built into the camera body is a big part of why you’ll keep trying to “hold” this camera in your “hands.” The built-in focus peaking is wonderful to use, and major reason why so much of Let’s Cook, the result of my hasty shoot, is in focus. You can also double-tap the display to zoom in for precise focus. But unless you’re on a tripod and operating at CWH (Comfortable Working Height), you will find the touchscreen difficult to use as a viewfinder. Red’s design of a detachable, adjustable Touch LCD may not be pleasingly minimalist or comfortingly DSLR-like, but it’s significantly more useful.
Despite the LCD being precisely where you’d put one on a camera meant for your hands, the BMC is not actually designed to be held. It lacks any kind of hand grip, and its ziggurat shape wants to fall out of your grasp, even as you try to place your thumbs over the buttons that cry out to have thumbs placed over them. The DSLR-esque shape of this camera is, unfortunately, more of an aspiration than a practical design feature.
Identity Crisis

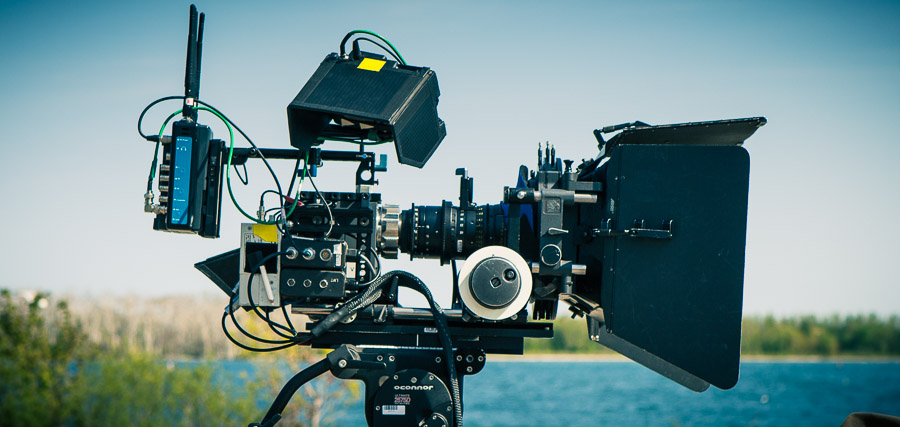
The way I tried to make the BMC behave like an HDSLR was by mounting it to my EyeSpy rig. It fit on with only a few modifications, but the counterweight was not nearly enough to balance out the front-heavy rig. For hand-held work, this camera really wants to be directly over your shoulder, like an Alexa or an Epic, with an EVF or small LCD monitor extended in front. Bear that in mind if you’re considering the BMC as a graduation present from the school of HDSLRs.
I love a good deal, and the Blackmagic Cinema Camera is a great one. But the touchscreen would be more usable, and would save BMC customers substantial money on accessories, if it was detachable and/or adjustable to a position that better acknowledges the reality of this camera’s size and weight. Even if the camera had to cost $1,000 more to accommodate this, the net would be a savings to the owner.
Now, about those buttons crying out for your thumbs. On the right is the Focus button, which toggles the super-helpful-on-the-rare-occasion-that-the-touchscreen-is-usable-as-your-EVF focus peaking. It’s really good. I wore myself out hefting my imbalanced rig around just so I could keep using it, and as a result, I did a better job pulling focus on Let’s Cook than I’ve ever done before.
The button on the left is labeled Iris, and it is stupid. Press it and the iris—on a compatible EF-mount lens—is set automatically, according to rules that require a glance at the manual:
When shooting using the Video dynamic range, the exposure will set using an average of scene similar to what you’re used to on a stills camera. However, in Film dynamic range, the IRIS button adjusts your exposure to ensure that nothing in your scene is clipped.
That Dynamic Range setting of Film or Video affects the recorded image when using ProRes, but not, of course, when recording raw. There’s a separate Film/Video setting for the LCD, which toggles a non-destructive Rec 709 LUT for the display. I shot raw, but used the Video setting on the LCD for a nice contrasty image. I wondered why, in raw mode, the Dynamic Range setting remained available—maybe just to control this Iris button behavior?
Anyway, back to this stupid button, that is stupid. Who exposes this way? Not camera people. Did I mention that there’s no display for f-stop?
There’s no display of your f-stop. Yet.
This Canon-mount camera prominently places a single button called “Iris” that allows the camera set your Canon lens stop auto-magically, and then not inform you of its choice.
Maybe it’s not such a bad thing that Blackmagic Design was not able to start shipping the BMC in quantity until they could address this insane shortcoming with a firmware update (pseudo-announced December 18th).
Back to the present: You can set your stop manually. But you won’t figure out how without another trip to the manual:
You can also manually adjust the iris of your lens by using the forward and reverse button on the Transport Control panel.
Of course. You use the (unlabeled) playback buttons to do the single most basic thing about shooting images. And even when making this adjustment manually with these repurposed buttons, you (for now) get no visual confirmation of your setting.
This is Blackmagic Design’s first attempt at making a camera, and the iris control situation is where you’ll notice that.
Of course, it’s entirely possible that you’ll be using EF-mount glass that has a manual iris ring, which renders this limitation meaningless. But a major selling point of this camera is its smart EF mount—yet to use it currently requires abandoning traditional control of the one setting that every cinematographer’s forefingers are born to adjust.
Or maybe you’ll opt for the Micro Four Thirds version of the camera. Certainly this mount makes more sense for the size of the BMC’s sensor. With the Canon mount, you’ll struggle to find fast, wide glass. But with the MFT mount, you might struggle to find glass that allows you to set your stop at all. If you’re a Panasonic shooter (you know you are if you’ve stopped reading long ago to leave a long-winded comment about how much better the GH3 will probably be than the BMC, especially with a firmware hack, ermahgerd), you’ll find that the “dumb” MFT mount won’t control your sealed-up, no-manual-iris-ring lenses. So the MFT BMC will only work with the subset if MFT glass that has a manual iris ring. Or, more likely, you’ll use the MFT mount as a permanent home for a PL-mount adapter. At which point you will be back to selecting among lenses optimized for a larger sensor. Exhausted yet?
I Gripe Because I Love
It takes a really great camera to earn this kind of criticism from me, and this camera is really great (if you were looking for the five words in this post that no one will read or remember, there they are). That it is available for a mere $3,000 is a miracle—in fact, a miracle that has yet to come true. I have every confidence that Blackmagic Design will work out their production kinks, about which they are being quite candid, and start shipping this thing en masse, soon.
But one has to wonder how many of these cameras, announced at NAB 2012, will be shipped before NAB 2013—an event at which, given the trend, we should expect to see 4K Super 35 digital cinema cameras being 3D-printed on demand from vending machines in hotel lobbies.
Shallowness
I shot Let’s Cook with one lens, the aforementioned Canon 50mm f/1.2 L. A rather telephoto lens on the BMC, but one that allows for shallow focus, even on the smaller sensor. Did I shoot wide open? Who knows? Not only does the camera not tell you its aperture, the DNG files don’t seem to have any EXIF metadata about shutter speed, lens, or f-stop.
By using a long, fast lens, I was able to achieve the shallow depth-of-field look I wanted. But this was only possible because I was willing to limit my focal length choices. If I’d gone to a wider lens, you’d have seen some much deeper focus.
Math
I shot raw. Not much footage, just 20 minutes. But that totaled out to 139 GB on one SSD. Maddeningly, as you shoot, you have no indication of how much room you have left on your SSD. Compare that with the Epic, which offers a remaining-media gauge so legible that I could easily read it when hanging out of a helicopter.
The internal, non-removable battery will also frustrate you with its uncommunicativeness. It offers only four phases: full, not so full, glass-half-full, and living-on-the-edge. Like my 1987 Mazda pickup with its rusted-out gas gauge, this is asking for trouble.
Blackmagic must address these readout issues with a firmware update, but even when they do, you should still think of the internal battery as little more than a convenient backup to avoid a power-down when swapping out external power. This is a camera that needs to be decked out with expensive EVF and V-lock battery solutions, rendering it no more hand-gripable than the Epics you see working in television and film.

The little BMC is trying, but failing, to live the self-contained grab-and-go DSLR lifestyle. But if you recognize it for what it is, a body that needs to be accessorized, this camera can be the core of a still-quite-affordable kit.
Post
Back when dinosaurs ruled the earth and I shot commercials on film, we would transfer our footage to tape in a process called teleciné (a term always sounded backwards to me). In this workflow, the teleciné bay is where color correction is done—before the edit. Some projects are still done this way, but it’s now the exception where it was once the rule.
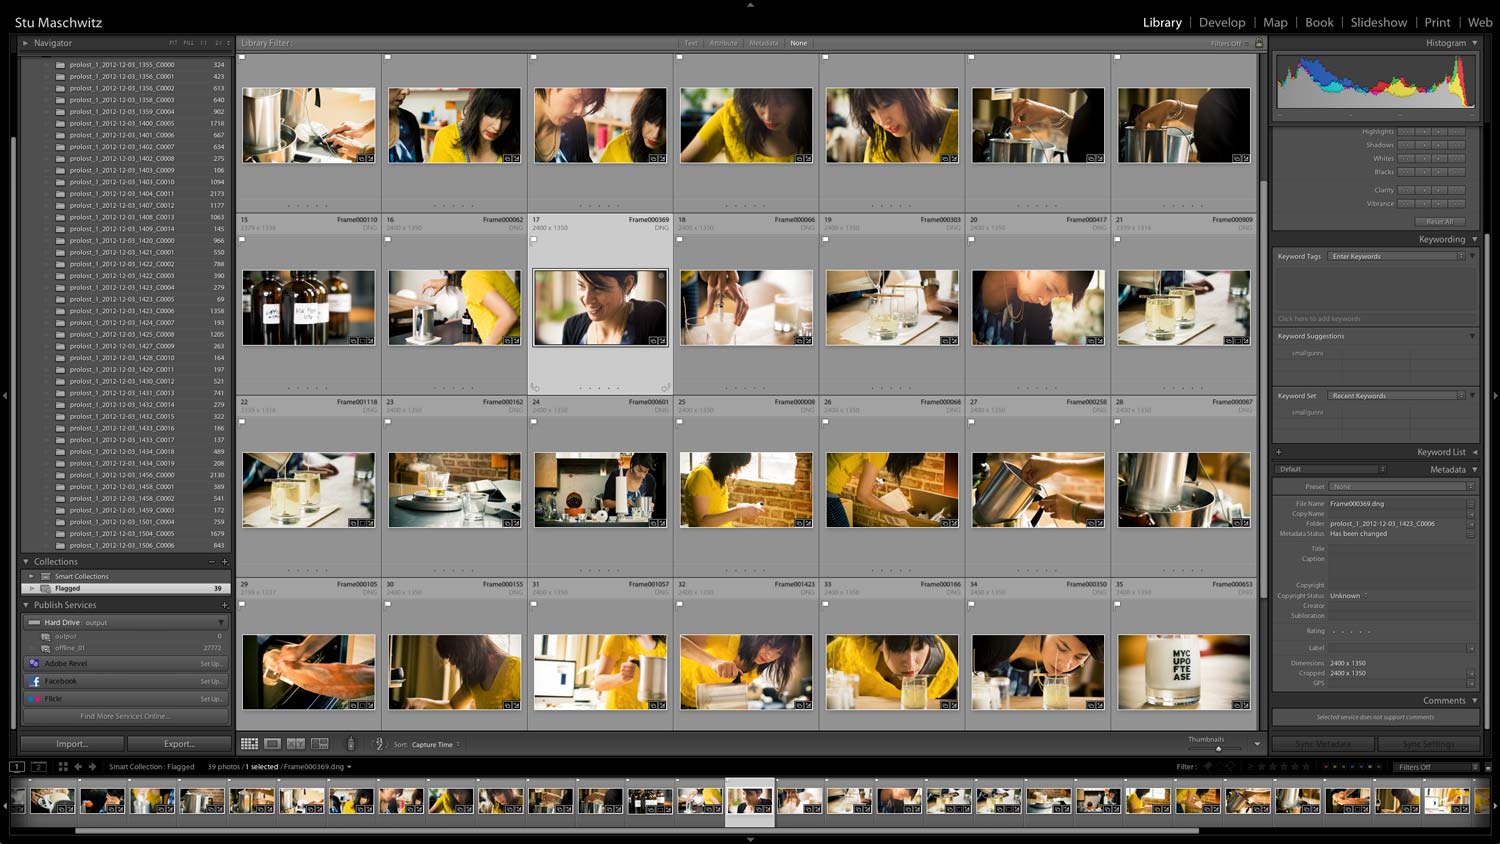
My teleciné bay for Let’s Cook was Adobe Lightroom 4, where I collected all the Cinema DNG files. This required not only telling Lightroom to import subfolders, so I could drag my one big media folder into the Import module, but also to not skip “duplicates,” as the BMC names all of its frames the same.
That’s right, if you shoot raw with the BMC, every shot will be made of of frame000001.DNG, frame000002.DNG, and so on. It’s the folder names that uniquely identify shots. I’d prefer it if the shot’s unique name was included in each frame’s filename.

So configured, Lightroom happily ingested all 27,772 of my frames, each shot organized as a unique folder. For each shot, I selected at least one “hero” frame by pressing P (to Pflag it). I then made a Smart Collection that filtered in all flagged images. Here I could compare the hero frame(s) of each shot. I picked a nice representative shot and entered the Develop Module.
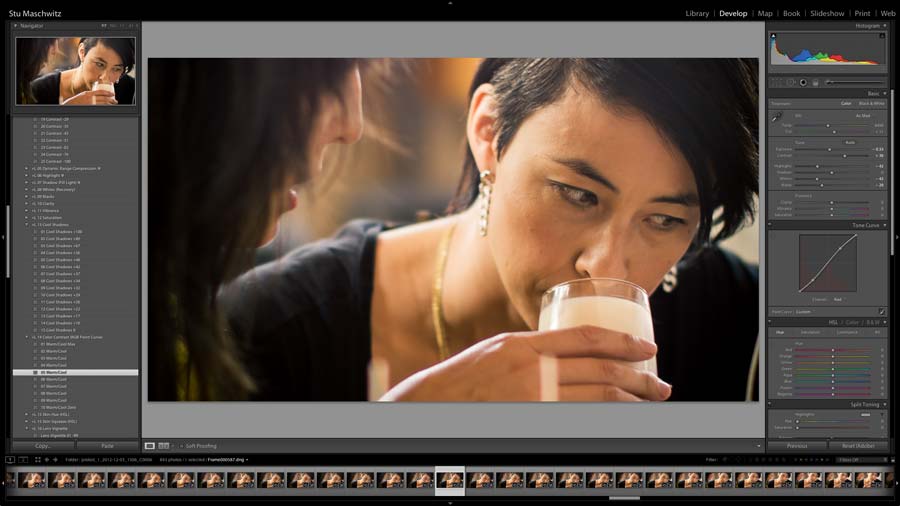
In Develop, I set the overall white balance and exposure. I wanted a bright, airy look that felt sunny and warm, but without completely blowing out the highlights. This specific goal was what made the Lightroom workflow worth every hoop jumped. Adobe’s Camera Raw engine is a glorious blend of art and science. The Exposure control is now a “do what I mean, not what I say” Exposure—it works in real-world stops, but it tries to avoid clipping highlights as you pump it up. The Whites control can be pulled back to soften the already gentle shoulder of the internal s-curve, for a highly controllable soft rolloff to white.
So far, so good. But then there’s the actual slider called Highlights. Based on HDR tone mapping research, this control must be wielded carefully if you, like me, suffer from an allergy to over-processed HDR photography. But in judicious amounts, the Highlights slider can tame overexposed areas in a way that feels miraculous, but stops short of making your images look like beneficiaries of miracles.
I dialed in my look on the first shot (using my Prolost Presets of course), then synced those settings to the other hero frames. I then adjusted each hero frame individually, with an eye toward getting them all to match. The Quick Develop controls were handy for this. They allow you to nudge the exposure and color balance while still in the grid view, which makes matching shots much easier.

With my hero frames all matched, I then went back to each shot folder and synced the hero frame Develop settings to all the other frames in their respective sequences. The result was 27,772 frames, each with its own color correction metadata.
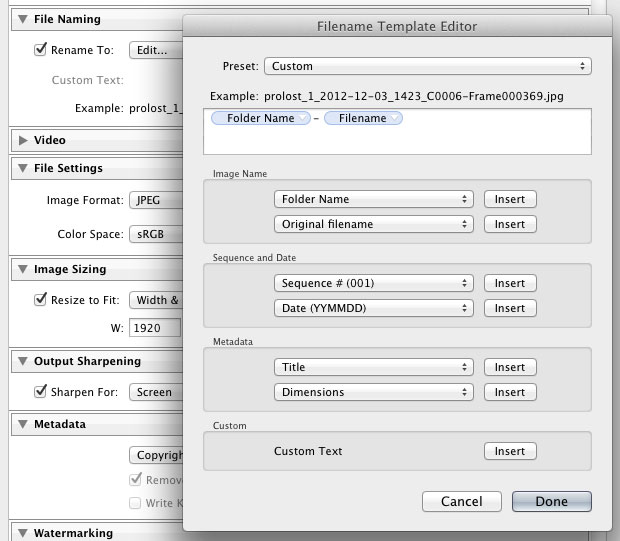
I then had to export the frames. For a moment, I contemplated the arduous task of creating individual Publish modules for each of the shots, something I thought I’d had to do when experimenting with the Cinema DNG sequences that John Brawley graciously made available from his initial test shoot. But laziness is the mother of invention, and so I figured out a way to export every single frame in one massive Publish module, giving each its rightful unique name. Lightroom’s export settings allow a high degree of filename customization, and one of the variables you can insert is the parent folder name. So my export filename recipe looked like this:

Although I’d be dumping all 27,000 HD JPEG frames into a single folder, each would have a name identifying it as a part of the correct shot. Lightroom’s flexibility allowed me to have my wish of each frame’s filename containing its shot name.
Note that I keep referring to publishing these frames out of Lightroom, not exporting them. In Lightroom, Exporting is a one-time event, but Publishing allows you to set persistent export settings and destinations, and then render the images at the push of a button. Lightroom keeps track of whether you’ve made changes since your last publish, and allows you to easily re-publish the modified photos. This would come in handy if I felt I needed to go back to Lightroom and fine-tune the color correction on some of the shots.
With 27,000 usefully-named 1920x1080 JPEG frames in one folder, I turned to After Effects CS6. Again, for a brief and painful moment, I thought I was going to have to import each sequence individually. I opened the Terminal and dusted off the part of my brain that remembers Unix commands, thinking I’d have an easier time if I moved each sequence into its own folder—but I stopped when I realized that, as much sense as that made, it would break Lightroom’s ability to overwrite the JPEGs with updates later.
Then I realized something wonderful. I don’t even know how I remembered this, but After Effects can automatically recognize multiple image sequences in a single folder. The option is hard to discover though, as it only becomes available when you select files spanning multiple sequences in the Import Dialog. Congratulating myself on my unwavering laziness, I selected all 27,000 files, checked the Multiple Sequences box, and pressed Open. This disk-intensive process and the progress bar that followed provided a nice opportunity to study the rainbow hues of the SBOD, but it worked. Each of my shots was now an individual frame sequence in After Effects.
Time to bust out another one of my favorite AE tricks: I dragged all these sequences straight into the Render Queue. This causes After Effects to set up a properly-configured Comp for each footage item, and add those comps to the Render Queue, using the default Render Settings and Output Module. The key is to make sure these two things are what you want them to be, and also to make sure that the last render file destination was a good one for the multiple Render Queue items you’re about to create. In my case, I rendered HD ProRes LT Quicktime files to my media drive.
Between Lightroom’s ability to name the frames according to their parent folder, and the powerful sequence recognition in After Effects, I was thankful to be using such robust and powerful software. Professional workflow tools really must be exempted from the less-is-more trend of software development inspired by the popularity of iOS. I’m one of this movement’s most vocal proponents—at Red Giant, I am jokingly referred to as “Simple Cop” (I picture Jim Carey in the role)—but on this day, I was grateful to have exactly the complexity I needed.
I edited the piece in Premiere Pro CS6, which handled my ProRes media so well that I was once again struck by how badly Adobe needs to standardize on a production codec.
I did bounce back to Lightroom a few times to update the color on a few shots. Which then caused me to have to re-render some of the ProRes files. Yes, there are simpler ways to post your BMC short. Long-time readers will know that I rarely choose the simplest post path. In this case, I was willing to bend over backwards to process these DNGs in Lightroom, and bend over backwards I did.

When the cut was locked, I imported the timeline into After Effects for finishing. Colorista II made it easy to do final tweaks on color—again, very much like the old teleciné-online workflow. The only challenging color task was matching in the iPhone 5 time lapse shot, achieved using the Time Lapse app and a custom-built LEGO stand. If I used a little negative Pop keyed to skin tones to make Diana and Michelle as beautiful on screen as they are in real life, well, I’d never tell.
There’s also one 5D Mark III shot. Magic Bullet Denoiser and Colorista II were essential in getting it to match with the BMC footage. Can you spot it?
Hey Let’s Talk About the Pictures Why Not
I love the way this little film looks. I couldn’t have done this with my 5D Mark III. The soft, gentle rolloff into overexposed, but not-blown-out highlights. The crisp details. The (I hope) invisible-to-the-viewer color correction work expended to match shots in wildly differing lighting conditions. This was all made possible thanks to the rich, generous bit-depth and spatial resolution of the BMC’s just-right raw files.
You can fairly complain about a lot of things about the BMC, but image quality is not among them.
The Homer Car
What I don’t like about this camera is the form factor. It’s not an HDSLR. You can’t use it like one. That’s fine of course, but then it needn’t and shouldn’t look like one.
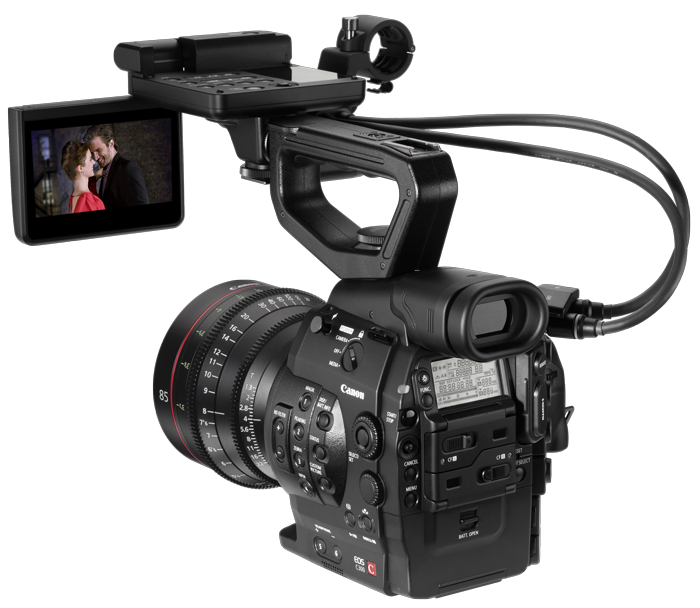
I was looking around for images to demonstrate what I think the BMC should have been shaped like, and my Googling took me right back to Prolost, to this page, and this image:

What would the BMC look like if the lens was closer to the operator-left edge, the body was more of a lump than a slab, and the glorious LCD was articulated in such a way that it could hang in front of the operator’s face while the camera rested on her shoulder? Why, the C300. There aren’t a lot of images out there of the C300 with its LCD in this low-slung mode, but now I see it as a brilliant design—especially when you remember that the hand grip on the right is removable. Put it on an extender and you’ve got a decent emulation of the famous Aaton “cat on shoulder” design.
Blackmagic, this is what your camera should look like.
Verdict
The BMC is an important camera. It changes the landscape of digital cinema cameras by stating definitively that it’s no longer OK to charge a premium for image quality. Instead, in much the same way that the Digital Bolex creators believe, it declares that a camera that focuses on bringing home the best quality image can actually be a much simpler affair than the option-rich, color-it-in-the-camera descendants of the broadcast world.
But it’s wise to be wary of a 1.0, and this camera isn’t even quite that. It feels like version 0.9. I’m not trying to be snarky by saying that—it’s just impossible to use this camera and think it’s “done.” Here are some reasons:
- No way of telling how full your media is
- Battery indicator shows only four steps
- No display of lens f-stop
- No thumbnail view of clips in playback mode
- No way to format media
- DNG frames from every shot are named identically
- No EXIF data in DNG frames
And then there are the little things, like turning the camera off. You press and hold the power button to do this. Hold it down log enough, the camera turns off. Hold it down a little too long though, and the camera turns off, then on again. Oops.
The BMC you order today is a purchase of a promise, that future firmware updates will address these issues. This is fine, as long as you feel that you’re getting your money’s worth now—which, of course, is an easy pitch to make when you compare the image quality of this camera with other offerings currently available at much higher prices.
The BMC is the avant garde of the next generation of digital cinema cameras—one that will be defined by uncompromised image quality in affordable packages. But while the avant guard are brave and important, they were also never expected to come home alive. This first expression of the BMC will be remembered for the territory it staked out more than as a lasting achievement in and of itself. Which is a shame, because today, it’s quite simply the best bang for the buck in digital cinema.
My advice? If you’re realistic about what it takes to kit one out, and you can use it a lot before mid–2013, buy one.
Update on Wednesday, December 19, 2012 at 11:32PM by
 Stu
Stu
I am informed that the firmware update that adds aperture display also fixes the DNG naming issue.
 Friday, July 26, 2013 at 12:17PM


